EASY
Earn 100

A vernier caliper has 20 divisions on the vernier scale which coincide with 19 divisions on the main scale. The least count of the instrument is 0.1 mm. The length of one main scale division is

34.47% studentsanswered this correctly

Important Questions on Units and Measurements

MEDIUM
If the screw on a screw-gauge is given six rotations, it moves by 3 mm on the main scale. If there are 50 divisions on the circular scale the least count of the screw gauge is:
MEDIUM
The length of an object is measured using a vernier system whose main scale is 30 cm long with 600 divisions. If 19 divisions of the main scale coincide with 20 divisions of the vernier scale, then its least count is
MEDIUM
A screw gauge with a pitch of 0.5 mm and a circular scale with 50 divisions is used to measure the thickness of a thin sheet of aluminium. Before starting the measurement, it is found that when the two jaws of the screw gauge are brought in contact, the 45th division coincides with the main scale line and that the zero of the main scale is barely visible. What is the thickness of the sheet if the main scale reading is 0.5 mm and the 25th division coincides with the main scale line?
MEDIUM
The least count of the main scale of a screw gauge is 1 mm. The minimum number of divisions on its circular scale required to measure 5 μm diameter of a wire is:
HARD

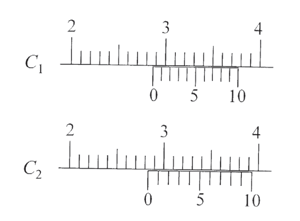
There are two vernier calipers both of which have 1 cm divided into 10 equal divisions on the main scale. The Vernier scale of one of the calipers C1 has 10 equal divisions that correspond to 9 main scale divisions. The Vernier scale of the other caliper C2 has 10 equal divisions that correspond to 11 main scale divisions. The readings of the two calipers are shown in the figure. The measured values (in cm) by calipers C1 and C2 respectively, are

EASY
A screw gauge has 50 divisions on its circular scale. The circular scale is 4 units ahead of the pitch scale marking, prior to use. Upon one complete rotation of the circular scale, a displacement of 0.5 mm is noticed on the pitch scale. The nature of zero error involved and the least count of the screw gauge, are respectively:
HARD
The diameter of a cylinder is measured using a vernier callipers with no zero error. It is found that the zero of the vernier scale lies between 5.10 cm and 5.15 cm of the main scale. The vernier scale has 50  divisions equivalent to 2.45 cm. The 24th division of the vernier scale exactly coincides with one of the main scale divisions. The diameter of the cylinder is, 
HARD
A specially designed Vernier caliper has the main scale least count of 1 mm. On the Vernier scale, there are 10 equal divisions and they match with 11 main scale divisions. Then, the least count of the Vernier caliper is:
MEDIUM
Diameter of a steel ball is measured using a Vernier calipers which has divisions of 0.1 cm on its main scale (MS) and 10 divisions of its Vernier scale (VS) match 9 divisions on the main scale. Three such measurements for a ball are given as:
S.No. MS (cm) VS divisions
1. 0.5 8
2. 0.5 4
3. 0.5 6

If the zero error is - 0.03 cm, then mean corrected diameter is:
EASY
A student measured the length of a rod and wrote it as 3.50 cm. Which instrument did he use to measure it ?
EASY
A screw gauge has least count of 0.01 mm and there are 50 divisions in its circular scale. The pitch of the screw gauge is:
EASY
In a screw gauge, 5 complete rotations of the screw cause it to move a linear distance of 0.25 cm. There are100 circular scale divisions. The thickness of a wire measured by this screw gauge gives a reading of 4 main scale divisions and 30 circular scale divisions. Assuming negligible error, the thickness of the wire is
EASY
Young's modulus of a perfect rigid body is
EASY
The least count of the main scale of a vernier calipers is 1 mm. Its vernier scale is divided into 10 divisions and coincide with 9 divisions of the main scale. When jaws are touching each other, the 7th division of the vernier scale coincides with a division of the main scale and the zero of vernier scale is lying right side of the zero of the main scale. When this vernier is used to measure the length of the cylinder the zero of the vernier scale between 3.1 cm and 3.2 cm and 4th VSD coincides with the main scale division. The length of the cylinder is (VSD is vernier scale division)
EASY
N divisions on the main scale of a vernier calipers coincide with N+1 divisions of the vernier scale. If each division of main scale is a units, then the least count of the calipers is
EASY

The vernier scale used for measurement has a positive zero error of 0.2 mm. If while taking a measurement it was noted that 0 on the vernier scale lies between 8.5 cm and 8.6 cm. Vernier coincidence is 6, then the correct value of measurement is cm.

(least count=0.01 cm)

MEDIUM
The pitch of the screw gauge is 1 mm and there are 100 divisions on the circular scale. When nothing is put in between the jaws, the zero of the circular scale lies 8 divisions below the reference line. When a wire is placed between the jaws, the first linear scale division is clearly visible while 72nd  division on circular scale coincides with the reference line. The radius of the wire is
EASY

The figure of a centimetre scale below shows a particular position of the Vernier calipers. In this position, the value of x shown in the figure is (figure is not to scale):

MEDIUM
A student measured the diameter of a small steel ball using a screw gauge of least count 0.001 cm. The main scale reading is 5 mm and 25th division of circular scale coincides with reference line. If screw gauge has a zero error of -0.004 cm, the correct diameter of the ball is
MEDIUM
The pitch and the number of divisions, on the circular scale, for a given screw gauge are 0.5 mm and 100 respectively. When the screw gauge is fully tightened without any object, the zero of its circular scale lies 3 divisions below the mean line.

The readings of the main scale and the circular scale, for a thin sheet, are 5.5 mm and 48 respectively, the thickness of this sheet is: